+918861816932
anushasanyoga@gmail.com
en English
af Afrikaanssq Albanianam Amharicar Arabichy Armenianaz Azerbaijanieu Basquebe Belarusianbn Bengalibs Bosnianbg Bulgarianca Catalanceb Cebuanony Chichewazh-CN Chinese (Simplified)zh-TW Chinese (Traditional)co Corsicanhr Croatiancs Czechda Danishnl Dutchen Englisheo Esperantoet Estoniantl Filipinofi Finnishfr Frenchfy Frisiangl Galicianka Georgiande Germanel Greekgu Gujaratiht Haitian Creoleha Hausahaw Hawaiianiw Hebrewhi Hindihmn Hmonghu Hungarianis Icelandicig Igboid Indonesianga Irishit Italianja Japanesejw Javanesekn Kannadakk Kazakhkm Khmerko Koreanku Kurdish (Kurmanji)ky Kyrgyzlo Laola Latinlv Latvianlt Lithuanianlb Luxembourgishmk Macedonianmg Malagasyms Malayml Malayalammt Maltesemi Maorimr Marathimn Mongolianmy Myanmar (Burmese)ne Nepalino Norwegianps Pashtofa Persianpl Polishpt Portuguesepa Punjabiro Romanianru Russiansm Samoangd Scottish Gaelicsr Serbianst Sesothosn Shonasd Sindhisi Sinhalask Slovaksl Slovenianso Somalies Spanishsu Sudanesesw Swahilisv Swedishtg Tajikta Tamilte Teluguth Thaitr Turkishuk Ukrainianur Urduuz Uzbekvi Vietnamesecy Welshxh Xhosayi Yiddishyo Yorubazu Zulu
Facebook
Twitter
LinkedIn
YouTube
Instagram
Anushasan YogaAnushasan YogaAnushasan YogaAnushasan Yoga
  • Home
  • About Us
    • Faculty
    • Yoga Review
  • Teacher Training
    • RYT 200 Hr Week Days(10:30am-4pm) Offline/Online Course
    • RYT 200 Hr Weekend (7am-11am) or 10.30am-2.30pm Offline/Online Course
    • RYT 200 Hr Week Days(11am-3pm) or 5pm-8pm Offline/Online Course
    • RYT 200 Hr Weekend (7.30am-1pm) or (10.30am-4pm) Offline/Online Course
    • Syllabus
      • 200 Hour Weekdays (10:30am to 4pm) Syllabus
      • 200 Hour Weekend (7am to 11am) Syllabus
      • 200 Hour Weekdays (11am to 3pm) Syllabus
      • 200 Hour Weekend 10.30am to 4pm Syllabus or (7.30am to 1pm)
  • Yoga Classes
    • Group Yoga Classes
    • Yoga at Home
  • Workshop
  • Online TTC
    • RYT 200 Hr Weekend ( 9am-12pm) Online Course
    • RYT 200 Hr Weekdays ( 10am-5pm) Online Course
  • YACEP
    • Yoga for Beginners Certification Course
    • Yoga Nidra Certificate Course
    • Sanskrit Mantra Chanting Certificate Course
    • 30 Hours Hatha Yoga Teacher Training Course
    • Mind Sound Resonance Technique (MSRT) Certificate Course
  • Registration
    • 200 Hr TTC- Online Registration
    • Short Term Yoga Course Registration
    • Yoga Classes Registration
    • Fees for 200 hr Course
    • Eligibility Criteria
    • Payment Options
    • Admission – Rules and Regulations
    • Tution and Refund Policy
  • Blog
  • Contact

Asanas

June 2, 2021yogaUncategorizedNo comments

1. Samasthiti(upright or equal standing pose)

Practice:
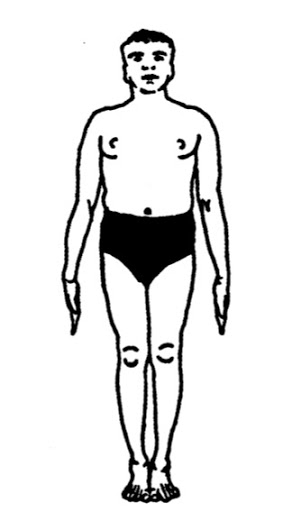
  1. Stand erect with the feet together, the heels and big toes touching each other. Rest the heads of metatarsals on the floor and stretch all the toes flat on the floor.
  2. Tighten the knees and pull the knee-caps up, contract the hips and pull up the muscles at the back of the thighs.
  3. Keep the stomach in, chest forward, spine stretched up and the neck straight.
  4. Do not bear the weight of the body either on the heels or the toes, but distribute it evenly on them both.
  5. Ideally in Tadasana the arms are stretched out over the head, but for the sake of convenience, one can place them by the side of the thighs. Each of the standing poses described below can then be followed easily, starting with the pupil standing in Tadasana with palms by the side of the thighs.

Precautions: No precautions for this pose.

Benefits:

  • The abdomen is pulled in
  • the chest is brought forward.
  • One feels light in body and the mind acquires agility.

2. Padahastasana (hand to foot pose)

Practice:

Come to Tadasana(mountain) posture, by arms beside your thighs.

Inhale raise arms side way till it touch ears.

Take deep inhale , by exhaling bend forward by keeping your knee straight from your lower back ( make sure not bending from your upper back  ( if you have back pain or weak back keep your knees bend)

Lengthen the neck and toward the feet.

At final phase keep the chest open as you resting your palms beside of your feet, Keep your feet firm , both leg straight  and stably grounded .

From hip to ankle should be in straight line.

Lenghten from your lower back and stretch from upper back, in hale through nose while exhale suck your abdomen in towards back , forward touching your shin bone not your knees.

Stay for 10 to 20 seconds, by deep breathing at your abdominal .

Caution: Persons suffering from high blood pressure and heart diseases should do with care; spondilitis and lumbago patients should avoid.

Benefits:

  • Helps preventing constipation and menstrual problems.
  • Improves digestion.
  • Enhances blood flow to the head region.

3. Virabhadrasana-1(warrior 1

Practice:
  1. Stand in Tadasana.
  2. Raise both arms above the head stretch up and join the palms.
  3. Take a deep inhalation and with a jump spread the legs apart sideways 4 to 5 feet.
  4. Exhale, turn to the right. Simultaneously turn the right foot 90 degrees to the right and the left foot slightly to the right. Flex the right knee till the right thigh is parallel to the floor and the right shin perpendicular to the floor, forming a right angle between the right thigh and the right calf. The bent knee should not extend beyond the ankle, but should be in line with the heel.
  5. Stretch out the left leg and tighten at the knee.
  6. The face, chest and right knee should face the same way as the right foot, as illustrated. Throw the head up, stretch the spine from the coccyx and gaze at the joined palms.
  7. Hold the pose from 20 seconds to half a minute with normal breathing.
  8. Repeat on the left side as in positions, reversing all processes.
  9. Exhale and jump back to Tadasana.

Precautions:

  • High blood pressure.
  • Heart problems.
  • Students with shoulder problems should keep their raised arms parallel (or slightly wider than parallel) to each other.
  • Students with neck problems should keep their head in a neutral position and not look up at the hands.

Benefits:

  • In this pose the chest is fully expanded and this helps deep breathing.
  • It relieves stiffness in shoulders and back.
  • tones up the ankles and knees and cures stiffness of the neck.
  • It also reduces fat round the hips.

4. Ushtrasana (camel pose)

Practice:

1.Kneel on the floor, keeping the thighs and feet together, toes pointing back and resting on the floor.

2. Rest the palms on the hips. Stretch the thighs, curve the spine back and extend the ribs.

3· Exhale, place the right palm over the right heel and the left palm over the left heel. If possible, place the palms on the soles of the feet.

4· Press the feet with the palms, throw the head back and push the spine towards the thighs, which should be kept perpendicular to the floor.

5· Contract the buttocks and stretch the dorsal and the coccyx regions of the spine still further, keeping the neck stretched back.

6. Remain in this position for about half a minute with normal breathing.

7· Release the hands one by one and rest them on the hips. Then sit on the floor and relax.

Breathing: Normal. Do not try to breathe deeply because the chest is already stretched.

Duration: Practice up to 3 times as a dynamic asana. Hold the final position up to 3 minutes as a static pose.

Contra-indications: People with severe back ailments such as lumbago should not attempt this asana without the guidance of a competent teacher.

Benefits:

  • People with drooping shoulders and hunched backs will benefit by this asana.
  • The whole spine is stretched back and is toned.
  • This pose can be tried conveniently by the elderly and even by persons with spinal Injury.
  • This asana is beneficial for the digestive and reproductive systems.
  • It stretches the stomach and intestines, alleviating constipation.
  • The backward bend loosens up the vertebrae and stimulates the spinal nerves, relieving backache, rounded back and drooping shoulders. .
  • The front of the neck is fully stretched, toning the organs in this region and regulating the thyroid gland.
  • It is helpful for people suffering from asthma.

5. Sukhasana (Easy pose)

Practice:

Sit with the legs straight in front of the body. Bend one leg and place the foot under the opposite thigh. Bend the other leg and place the foot under the opposite thigh. Place the hands on the knees in chin or jnana mudra. Keep the head, neck and back upright and straight, but without strain. Close the eyes. Relax the whole body. The arms should be relaxed and not held straight.

Contra-indications:

Knee injury

Benefits:

  • Sukhasana is the easiest and most comfortable of the meditation It can be utilized without ill effect by persons who are unable to sit in the more difficult meditation postures.
  • It facilitates mental and physical balance without causing strain or pain.

6. Janu Sirsasana (Head to Knee Pose)

Practice:
  1. Sit on the floor, with legs stretched straight in front.
  2. Bend the left knee and move it to the left, keeping the outer side of left thigh and the left calf on the floor.
  3. Place the left heel against the inner side of the left thigh near the perineum. The big toe of the left foot should touch the inner side of the right thigh. The angle between the two legs should be obtuse. Do not keep the left knee in line with the left thigh at a right angle to the extended right leg. Try and push the left knee as far back as possible, so that the body is stretched from the bent leg.
  4. Extend the arms forward towards the right foot and hold it with the hands. First catch the toes of the right foot, then gradually catch the sole, then the heel and finally extend the arms and catch the wrist of one hand with the other, beyond the outstretched foot.
  5. Keep the right leg stretched throughout by tightening the knee. See that the back or the right knee rests on the floor.
  6. Exhale, move the trunk forward by bending and widening the elbows, and rest first the forehead, then the nose, then the lips and lastly the chin beyond the right knee. Then rest on either side of the right knee. The right foot will tilt to the right in the beginning. Do not allow the leg to tilt against the right thigh.
  7. Stay in this position with deep breathing from half a minute to a minute. One can also do the pose holding the breath after each exhalation.
  8. Inhale, raise the head and trunk, straighten the arms and gaze up for a few seconds, extending the spine and trying to make it concave.
  9. Release the hand grip on the right foot, straighten the left leg and come back to position I.
  10. Repeat the pose keeping the left leg stretched out and bending the right leg at the knee. Stay in the pose for the same length of time on both the sides.

Contra-indications:

  • As this pose works hard on the legs and the lower back there are certain precautions to be taken while practicing this pose. Some of these are mentioned below.
  • Avoid this pose if one is suffering from severe low back pain. In this pose, one will notice that one side of the hip is more flexible than the other side. One side of the back muscles would be more stiff than the other and can cause more injury if pulled forward without understanding the movement of the body and hence with a severe low back pain, it would only worsen the situation.
  • If the knees are injured, then the stretch one gets during the practice of Janu Sirsasana, behind the knee may aggravate the injured knee. An injured knee will not support the hamstring and hence tensions at the hamstrings would also arise causing more stiffness during the practice. Hence it is advisable to take precautions or guidance when practicing this pose with injured knee.
  • Not to be practiced by pregnant women as there is pressure at the lower abdomen with the forward bend.
  • If there is an injury at the shoulders and at the neck, it can be difficult to practice this pose as pulling of the neck and the shoulders forward to give it a deep stretch is essential to reach for the knee with the forehead.

Benefits:

  • This asana tones the liver and the spleen and thereby aids digestion.
  • It also tones and activates the kidneys.
  • Persons suffering from enlargement of the prostate gland will benefit by staying longer in this pose. They should practice this asana along with Sarvangasana.
  • The pose is also recommended for people suffering from low fever for a long time.

7. Shavasana (Corpse Pose)

Practice:

Lie flat on the back with the arms about 15 cm away from the body, palms facing upward. A thin pillow or folded cloth may be placed behind the head to prevent discomfort. Let the fingers curl up slightly. Move the feet slightly apart to a comfortable position and close the eyes. The head and spine should be in a straight line. Make sure the head does not fall to one side or the other. Relax the whole body and stop all physical movement. Become aware of the natural breath and allow it to become rhythmic and relaxed. Meter some time, again become aware of the body and surroundings, and gently and smoothly release the posture.

Steps:

  • Observe your breath….
  • Recognize the slowing down of your breath….
  • The breathing is becoming normal, natural and spontaneous….

Precautions:

No Precautions.

      Benefits:

  • Brings The Body To A Meditative State
  • Relaxes And Calms The Body.
  • Reduces Blood Pressure And Anxiety
  • Improves Concentration And Memory
  • Increases Levels Of Energy

8. Urdhva Chakrasana (upward wheel pose)

Practice (This is for beginners)
  1. Lie flat on the back on the floor.
  2. Bend and raise the elbows over the head, and place the palms under the shoulders. The distance between the palms should not be wider than the shoulders and the fingers should point towards the feet.
  3. Bend and raise the knees, then bring the feet nearer until they touch the hips.
  4. Exhale, raise the trunk and rest the crown of the head on the floor. Take two breaths.
  5. Now exhale, lift the trunk and head and arch the back so that its weight is taken on the palms and the soles.
  6. Stretch the arms from the shoulders until the elbows are straightened, at the same time pulling the thigh muscles up.
  7. To get a better stretch, exhale and pull the thigh muscles still higher by lifting the heels off the floor. Extend the chest, stretch up the sacral region of the spine until the abdomen is taut as a drum and then lower the heels to the floor, maintaining the stretch of the spine.
  8. Remain in this position from half a minute to a minute, with normal breathing.
  9. With an exhalation, lower the body to the floor by bending the knees and elbows.

Breathing: Inhale in the starting position. Retain the breath inside while raising the body. Retain the breath inside or breathe normally in the final position. Exhale while lowering the body.

Contra-indications: Chakrasana should not be practiced by people with any :

  • illness,
  • weak wrists,
  • weak back,
  • during pregnancy
  • when feeling generally tired.
  • The cautions for inverted postures apply.

Benefits:

Chakrasana strengthens the legs.

  • It is beneficial to the:
  • nervous,
  • digestive
  • respiratory,
  • cardiovascular
  • glandular systems.
  • It influences all the hormonal secretions and helps relieve various gynaecological

9 . Makarasana (Crocodile Pose)

Practice: Lie flat on the stomach. Raise the head and shoulders and rest the chin in the palms of the hands with the elbows on the floor. Keep the elbows together for a more pronounced arch to the spine. Separate the elbows slightly to relieve excess pressure on the neck. In Makarasana the effect is felt at two points: the neck and the lower back. If the elbows are too far in front, tension will be felt in the neck; if they are drawn too close to the chest, tension will be felt more in the lower back. Adjust the position of the elbows so that these two points are equally balanced. The ideal position is when the whole spine is equally relaxed. Relax the whole body and close the eyes. After some time, again become aware of the body and surroundings, and gently and smoothly release the posture.

Breathing: Natural and rhythmic, or practice inhaling, moving the awareness up along the spine from the tail bone to the neck and exhaling, bringing the awareness back down from the neck to the tail bone. Feel the breath moving up and down the spine. This will quickly activate the healing energies in this area. For lower back pain due to tension, concentrate on this area and feel it expanding and relaxing with every inhalation and exhalation.

Contra-indications: Those with back conditions, such as exaggerated lumbar curve, should not practice this asana if any pain is experienced.

Benefits: This asana is very effective for people suffering from:

  • slipped disc,
  • sciatica,
  • certain types of lower back pain.
  • They should remain in this asana for extended periods of time as it encourages the vertebral column to resume its normal shape and releases compression of the spinal nerves.
  • Asthmatics and people who have any other lung ailments should practice this simple asana regularly with breath awareness as it allows more air to enter the lungs.

10. Bhujangasana(serpent pose)

Practice:
  1. Lie on the floor face downwards. Extend the legs, keeping the feet together. Keep the knees tight and the toes pointing.
  2. Rest the palms by the side of the pelvic region.
  3. Inhale, press the palms firmly on the floor and pull the trunk up. Take two breaths.
  4. Inhale, lift the body up from the trunk until the pubis is in contact with the floor and stay in this position with the weight on the legs and palms.
  5. Contract the anus and the buttocks, tighten the thighs.
  6. Maintain the pose for about 20 seconds, breathing normally.
  7. Exhale, bend the elbows and rest the trunk on the floor. Repeat the pose two or three times and then relax.

Breathing: Inhale while raising the torso. Breathe normally in the final position or retain the

Contra-indications: People suffering from:

  • peptic ulcer
  • hernia
  • intestinal tuberculosis or hyperthyroidism should not practice this asana without the guidance of a competent teacher.

Benefits:

  • The posture is a panacea for an injured spine and in cases of slight displacement of spinal
  • discs the practice of this pose replaces the discs in their original position.
  • The spinal region is toned and the chest fully expanded.
  • This asana improves and deepens breathing.
  • It can help to remove backache and keep the spine supple and healthy.
  • It tones the ovaries and uterus, and helps in menstrual and some other gynaecological disorders. It stimulates the appetite, alleviates constipation
  • beneficial for all the abdominal organs, especially the liver and kidneys.

Contra-indications:

  • People suffering from high blood pressure,
  • heart conditions
  • hernia should not practice

11. Phalakasana (Plank Pose) or Santolanasana (balancing pose)

Practice:

Come into the starting position of marjari (cat )asana. Grasp the ground with the toes. Straighten the knees, move the shoulders forward and drop the buttocks until the body is straight. The arms should be vertical. Focus the gaze on a fixed point in front. Hold the final position for a short duration. Lower the knees to the floor. Relax in marjariasana or shashankasana. Practice up to 5 times.

Breathing: Breathe normally throughout the practice.

Benefits:

  • This asana improves nervous balance
  • develops a sense of inner equilibrium and Harmony.
  • It strengthens the muscles of the thighs, arms, shoulders and spine.
Variation I: Assume the final position of santolanasana. Slowly raise the left arm, keeping the body straight, and roll onto the right side so that the chest faces forward.

The outer side of the left foot must be firmly on the floor with the right foot resting on top of it. Rest the upper arm and hand along the trunk and thigh.

Balance in this position, keeping the body straight. Roll back to the initial position and repeat the movement to the left side. Practice up to 5 times on each side.

Breathing: Breathe normally in the base position. Retain the breath inside when practicing the variations. Variation 2: Assume the final position of santolanasana. Focus the eyes on a point in front of the body. Raise the left arm and place it behind the back so that the forearm rests across the small of the back. Lower the arm and repeat on the other side.

Contra-indications:

  • People suffering from high blood pressure,
  • heart conditions
  • hernia should not practice

Benefits: As for the basic form; in addition, variations 2 and 3 balance the interaction between the dorsal and ventral muscles.

12. Kukkutasana(cockerel pose)

Practice:
  1. Sit in Padmasana.
  2. Insert the hands in the space between the thigh and calf near the knees. Start with the fingers and gradually push the hands down up to the elbows.
  3. Exhale, raise the body off the floor and balance on the palms keeping the thumbs together. Maintain the balance as long as you can with normal breathing.
  4. Rest on the floor, release the hands, change the crossing of the legs and repeat the pose.

Breathing: Take a deep breath in and raise the body. Breathe normally in the final position. Exhale while lowering.

Contra-indications: This is a strenuous asana, not suitable for people with:

  • heart conditions•high blood pressure•prolapse•hernia•back pain.

Benefits:

  • This posture strengthens the wrists and abdominal walls.
  • This posture strengthens the arm and shoulder muscles
  • stretches the chest
  • It develops a sense of balance and stability.
  • It is used in the process of kundalini awakening due to the stimulation of mooladhara chakra.
Tags: Asana, Ayurveda, Balancing Asana, Classical Surya Namaskara, Mudras, Pranayama, Shat-Karma, Standing forward bending, Yoga
yoga
Previous post Yoga Marketing & Promotion Next post Surya Namaskara- Satyananda School of Yoga

Leave a Reply Cancel reply

Your email address will not be published. Required fields are marked *

7 + 3 =

Hatha Yoga

Asana Ayurveda Balancing Asana Classical Surya Namaskara Mudras Pranayama Shat-Karma Standing forward bending Yoga

Guru–Shishya Tradition

Asana Ayurveda Balancing Asana Classical Surya Namaskara Mudras Pranayama Shat-Karma Standing forward bending Yoga

Asanas

Asana Ayurveda Balancing Asana Classical Surya Namaskara Mudras Pranayama Shat-Karma Standing forward bending Yoga

Pancha Kosha Yoga Nidra

Asana Ayurveda Balancing Asana Classical Surya Namaskara Mudras Pranayama Shat-Karma Standing forward bending Yoga

Understanding Biomechanics

Asana Ayurveda Balancing Asana Classical Surya Namaskara Mudras Pranayama Shat-Karma Standing forward bending Yoga

Contact Us

102, bilden swaraganga, jakkasandra,koramangala ist block Bangalore-560034
+918861816932
anushasanyoga@gmail.com

ANUSHASAN YOGPEETH IconANUSHASAN YOGPEETH

5.0 37 reviews

Important Links

  • Home
  • About Us
  • Registration
  • Syllabus
  • Online TTC
  • Our Team
  • Blog
  • Contact
Facebook
Twitter
LinkedIn
YouTube
Instagram

Latest Blog

  • Migraine Headache & Sky Visualization
  • Surya Namaskara- Satyananda School of Yoga
  • Asanas
  • Yoga Marketing & Promotion
  • Pancha Kosha Yoga Nidra


+28
°
C
+29°
+21°
Bangalore
Friday, 11
See 7-Day Forecast


Quick Contact


    Please prove you are human by selecting the Flag.

    • Home
    • About Us
    • Registration
    • Syllabus
    • Online TTC
    • Our Team
    • Blog
    • Contact
    © Copyright 2020 Anushasan Yoga | All Rights Reserved

    WhatsApp us